Showing posts with label 3D items. Show all posts

Thursday, April 11, 2024

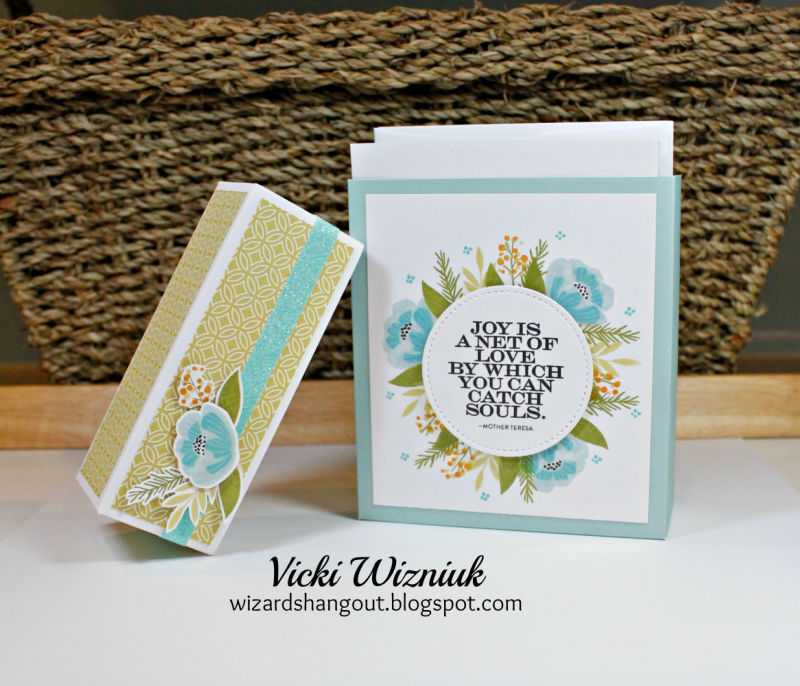
Large Card Keeper Box Instructions


Hi everyone!


I know it has been quite a while since I shared on here.


BUT... I have so many new things to talk about.  I will get to that another day though.


Today I want to share some instructions that I finally got around to typing up as a PDF file for you.  It is for a Large Card Keeper Box, originally designed by Erica Cerwin way back in 2012.  I created a box using Erica's free instructions that I shared here on my blog back in 2012, as well as sharing it on Pinterest.  I still get contacted with requests for the instructions (just 2 again last week) because of the reach that Pinterest has.


I finally broke down and took the time to type them up (it seriously takes a day to do all this), and I included all of my changes to her original instructions, and I am sharing those with you today.  Erica's free instructions were shown step by step with photos on her blog, but they were not in a printable file. 

So after all these years... here they are for you, also for FREE.  Enjoy!  


Large Card Keeper Box Instructions


Note:  the tabbed monthly inserts flip over for the other six months


Monday, March 18, 2019

Washi Tape Holder


It has been a while since I posted here, but I've been posting things over on my Facebook page.

So now it's time to play catch-up.  ;)


The original instructions for this Washi Tape Holder were done by Pootles.
You can find her video tutorial here.

I simply adjusted her measurements for my needs, and have my measurements in a photo below.

You can find sooooo many vidoes on YouTube done by Pootles. 
Luv her.  ♥


As my amount of rolls of Washi expands, I can easily add another holder.


Happy creating!  :)


Monday, October 2, 2017

From The Heart Boxed Card Set


There was a special Close To My Heart promo last month that included a terrific stamp set, called From the Heart.

Over the past month, I have seen quite a few beautiful projects created with this stamp set.  Like this one from Chris Franco that really stood out to me, and which I ended up using as inspiration for my boxed card set.


The sentiment I used on the box is from one we received at Convention in 2016.


The birthday sentiment I used on the cards is from Birthday Sparkles.


Inks used on the above card:
Glacier, Lagoon, Flaxen, Fern, New England Ivy, Goldrush, Black


Inks used on the above card:
Bashful, Pomegranate, Flaxen, Fern, New England Ivy, Goldrush, Black


Inks used on the above card:
Thistle, Pansy, Flaxen, Fern, New England Ivy, Goldrush, Black


Inks used on the above card:
Tangerine, Goldrush, Flaxen, Fern, New England Ivy, Cranberry, Black


Wouldn't this make an amazing gift???  I know I would love to receive it.  lol


I seriously am in love, love, LOVE with these cards.  Chris did an amazing job on hers, and made re-creating them super easy.


On a side note, I used to sell my instructions on how to create this card box, but I lost all of my files when I dropped my laptop about 2.5 yrs ago.  :(


Happy creating!  :)


Friday, August 18, 2017

Large Card Box


Hey, all!

I re-typed and re-vamped my instructions for my Large Card Box that I lost when I dropped my laptop about two years ago.

These new instructions include updated photos, and I also added cutting guides.


I was able to fit 18 cards and envelopes into the box shown below, but with less bulky cards, it could fit up to 24.


This would make a nice handmade gift to give someone, filled with Christmas, birthday, or all-occasion cards.


It holds standard A2 size cards:  4 1/4" x 5 1/2"


I sell my instructions for this card box for $4 through Paypal.

Payments can be sent to:  vwizniuk@gmail.com


Happy creating!  :)


Saturday, May 27, 2017

Aloha... with Live Love Laugh - May SOTM


Here is a fun and super easy little project I created, using the Live Love Laugh, May Stamp of the Month set.


I stamped the letters using Memento Black ink, then coloured them in with the Turquoise Blue Shin Han marker.


This set is available only until May 31st!


Happy creating!  :)


Saturday, February 11, 2017

Business Card Holders


I was having fun the other day, making these business card holders.

I always enjoy trying out a paper template I haven't made before...


The one above, I used Dreamin' Big paper, and the one below, I used Hello Lovely.


You can find Pootles' youtube video tutorial here.


Happy creating!  :)


Tuesday, January 10, 2017

National Papercrafting Month - Welcome Home Wreath Kit!!!


I wanted to share this with you all.  Here is the wreath I made with my Welcome Home Wreath Kit, celebrating National Papercrafting Month with CTMH!

It is so pretty, and I have it hanging in my studio.


Everything in the kit is die cut so all you have to do is pop the pieces out of the sheets and adhere them together with your favourite adhesive.

The circular base is a sturdy chipboard piece, which also has a die cut woodgrain pattern piece of paper to adhere right onto it.  So easy.

If anyone is interested in doing this as a class, or just needs some helpful tips on the flowers and succulents, please feel free to contact me by email.  vwizniuk@pris.ca

I will mention that to make it easier to put together, a couple of useful tools are the Z1795 Quilling Tool, and Z1204 Bone Folder.  They aren't necessary, but do help for easy assembly.  

I love the gold sticker letters that come with the kit, so you can choose whatever you wish to put on the banner to customize your wreath.


There are four ways you can get the wreath kit:

  1. Buy it for $24.25—no qualifying purchase required!
  2. Get it for free with a qualifying $60 purchase!
  3. Get it for free by hosting a party that reaches the second level of Hostess Rewards.
  4. Get it for free when you sign up to be a Consultant!


 ***This kit is only available while supplies last during the month of January.


Happy creating!  :)


Tuesday, December 27, 2016

This & That Post It Note and Pen Holder


I often come across some cute papercraft projects that I have to make myself.

This is one of those times.


Super cute, hey?

For my box, I used the CTMH Swan Lake papers, the This & That stamp set, and the Hello Thin Cuts die.


Here is the link for the how-to video by Libby Dyson for her Notebox and Pencil holder.


Happy creating!  :)


Wednesday, December 21, 2016

Christmas Poppers


I was wanting to have some Christmas poppers at my table this Christmas, but when I looked at the goofy little things that would come inside them, I decided I wanted to make my own and fill them with Lindt chocolates.

And then I came across Allison Okamitsu's post on this very topic!  She made it so easy for me...


I used some older, retired CTMH Jingle paper, that I still have a lot left over...


If you want to make your own, here is the how-to video by Allison Okamitsu that she had shared on her Facebook page on December 1st.


Happy creating!  :)


Thursday, August 11, 2016

Guest Blogger at Creative Scrapbooker Magazine!


Whoop, whoop!

I have some exciting news to share!

I was asked to be a guest blogger over at the Creative Scrapbooker Magazine blog!


Here's just a teaser of what I shared using some of the new Close To My Heart products available now, but you can check out my projects in full over on the Creative Scrapbooker Magazine blog HERE!


Happy creating!  :)


Tuesday, July 19, 2016

Convention Roomie Gifts


Now that Convention is over and I am back home from an extended stay in Disney World, I can share the gifts I made for my Convention roommates.


I think they liked them.  ;)


Edited to add:  Here is the link to the same Mini Album I made, but where I used 6x6 kraft cards and envelopes for the pages.  For this mini album I just used 6x6 pieces of kraft cardstock for the pages.


Happy creating!  :)


Sunday, April 17, 2016

Smile! Life In Pictures Sticky Notes


I saw a picture on Facebook posted by fellow CTMH Consultant, Amy McGrew, where she made a bunch of these sticky note holders for her team gathering, and I was inspired to re-create them, of course with my own little twists.  ;)

Thanks for the inspiration, Amy!


They are super cute, and I love the way the Life In Pictures Stamp of the Month set shines in this simple and fun creation!  This is definitely one of my favourite SOTM sets ever!

Amy had cut her notepad holders using the Artiste Cricut Cartridge (page 60).

So I did the same, but the dimensions were too thick to my liking, so I measured it up to make the thickness more to what I wanted and cut my own out of cardstock.


Instructions (on the way I made mine):

  • I cut a piece of coloured cardstock to 3 1/4" x 8 3/8".
  • I scored it at 3 1/4", 3 1/2", 6 3/4" and 7".
  • Then I took the Artiste Cricut Cartridge piece of cardstock and used it as a template to trace the scroll/bracket shaped end onto my piece of cardstock (trace it on the end with the shorter side after it has been scored.)  Then trim it out with your scissors.
  • Use a bone folder to fold your score lines.
  • Stamp a 2 7/8" square piece of White Daisy cardstock with the camera images from the Life In Pictures stamp of the month stamp set, in Black ink.
  • Mat it with a 3 1/8" square piece of Black cardstock.
  • Stamp Smile! across a 1/2" x 3 1/4" piece of White Daisy cardstock, and adhere it 1/4" from the top fold score line above the scroll/bracket shaped end.
  • Cut a piece of Black Shimmer trim in half and to 3 1/4" length.  Attach it just below the Smile! cardstock piece.
  • Add a Clear Sparkle.
  • Adhere a 3"x3" sticky note pad inside.
  • Add a velcro dot on the front for a closure.  


Life in Pictures is only available until April 30th,
either at the full retail price of $21.25 or just $6 with a $50 order.


Happy creating!  :)


Supplies used are all CTMH (unless otherwise noted):
Paper:  Black, White Daisy, Glacier, Canary, Smoothie CS
Stamp:  Life In Pictures - April SOTM
Ink:  Black
Embellishments:  Black Shimmer Trim, Clear Sparkles
Other:  Artiste Cricut Cartridge, Micro-tip Scissors, Velcro (other), 3x3 Sticky Notes (other)


Wednesday, March 23, 2016

Bag In A Box Large Hallett Purse


I came across the instructions for these purse/bags on Pinterest and had to pull out my papers to give one a try.


You can find the instructions for the Large Hallett Bag HERE.


For my purse I used papers from La Vie En Rose, and some retired pink bigger brads.


It is fairly large and I am not sure what I am going to use it for yet, but I decided to shrink it down a bit and make one to hold a set of 5 1/2' x 4 1/4" cards.

I will share those next time.


Happy creating!  :)


Saturday, March 5, 2016

Kaleidoscope Birthday Shadow Box Frame Card


I have a fun birthday card to share with you today.

This style of card is called a Shadow Box Frame Card.
(You can find instructions by Amanda Bates HERE.)


I used the CTMH stamp set from the Kaleidoscope Cardmaking Workshop Kit for this one.


I think I will be making more of these shadow box frame cards in the future!


Happy creating!  :)


Supplies used are all CTMH:
Paper:  Kaleidoscope; Colonial White, Pixie CS
Stamp:  Kaledoscope Cardmaking Workshop stamp set
Inks:  Pixie, Canary, Pear, Gypsy, Whisper
Embellishments:  Grey Wool Bakers Twine - retired
Other:  3D foam tape, Micro-tip scissors


Friday, February 20, 2015

A Celebration - Circle Treat Box


Ok, so admittedly I have quite a few photos sitting on my laptop of past projects I've made but haven't shared yet.

Here is one of those projects.


The original idea that I came across for using a large circle to create a box was from Andrea Walford, but I discovered that none of the links were working anymore, so I can't link up to the original instructions.

So I took out my ruler and my treat holder, wrote down the basic scoring measurements, and made up my own instructions to share with you.


Circle Treat Box

  • Cut a 8 1/2" circle out of cardstock
  • Score the circle at 5" and 5 1/2"
  • Turn circle and score at 1 5/8", 2 1/8", 6 3/8", 6 7/8" (Tip: I used a ruler to make sure it was square before I scored these lines)
  • Fold on all score lines using a bone folder to get a nice crisp fold
  • Use your scissors to trim off the pieces (shown in photo below)
  • Adhere sides of box together


Happy creating!  :)


Supplies used are all CTMH (unless otherwise noted):
Paper:  Lollydoodle - retired; White Daisy, Black, Lagoon CS
Stamp:  Big Top
Inks:  Black, Sunset, Lagoon, Whisper
Markers: Lagoon, Sunset - both retired
Embellishments:  Aqua Dots
Punches:  Large Oval (SU), 5/8" circle (EK), Scallop Border
Other:  Circle cutter (MS), Micro-tip scissors, bone folder, 3D foam tape


Wednesday, December 10, 2014

Hanging Photo Clipboard and Printable Christmas Decor


Ok, so here's a couple of different crafty things to share...


First up is a hanging photo clipboard.

I like these because you can easily switch out the photo.

I actually bought the photo clipboard from a rustic country store, but it was a little cheesy and not rustic at all, so I removed the clip and tucked the ribbon behind the mdf board and spray painted it with a few coats of chalkboard spray paint.


After it dried completely, I cut out a shape large enough to frame a 4x6 photo using my Cricut and some scrap cardstock.  I then used a white chalk pen and outlined the shape, and added some extra lines.  


The last step was to screw the clip back on to the mdf, and then I added the stickers.


My second project simply used this printable I found via Pinterest, and a red frame from Ikea.


Happy creating!  :)


Sunday, March 2, 2014

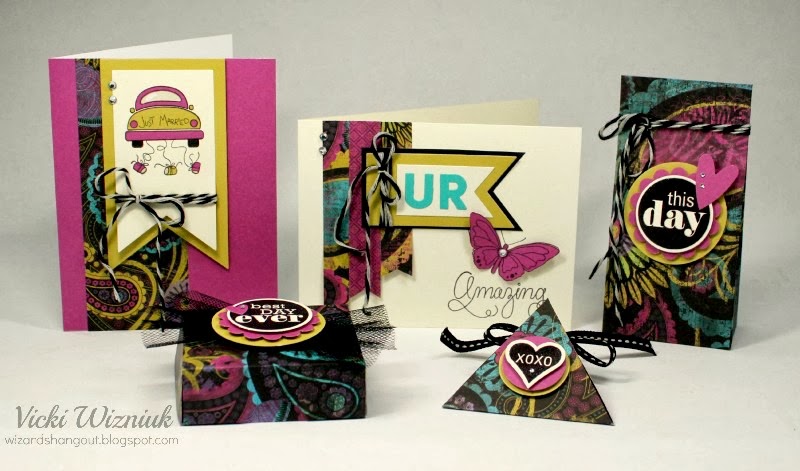
Laughing Lola One Sheet Wonder Set


Isn't this a great set?

And to think it is made with just one sheet of patterned paper!


Note:  I received the One Sheet Wonder instructions from Angie Kennedy Juda for joining her newsletter mailing list, but I don't have permission to share it with you.  (Her site is temporarily down, and she is working to get it fixed.)

So if you are looking for the instructions, I would suggest that you join her newsletter mailing list to see if you can get access to it that way.


Happy creating!  :)


Supplies used (all CTMH unless otherwise noted):
Paper:  Laughing Lola; Colonial White, Laughing Lola Gold, Laughing Lola Purple, Lagoon CS
Stamps:  Love This, It's Your Day - retired, Newlyweds
Inks:  Black, Versamark
Markers:  Whisper, Black
Embellishments:  Clear and Bitty Sparkles, Black Baker's Twine, Black Stitched Grosgrain - retired, Black Tulle - retired
Punches:  1 1/8", 1 1/4", 1 1/2", 2" circles (EK), Scallop circle (SU), Heart To Heart (SU)
Other:  Kraft knife, Stylus, 3D foam tape, Micro-tip scissors, Modern Alphabet Upper Die Collection (PTI), Banners Thinlets dies (SU)


LinkWithin

Blog Widget by LinkWithin