Showing posts with label Bags/Containers. Show all posts

Wednesday, March 23, 2016

Bag In A Box Large Hallett Purse


I came across the instructions for these purse/bags on Pinterest and had to pull out my papers to give one a try.


You can find the instructions for the Large Hallett Bag HERE.


For my purse I used papers from La Vie En Rose, and some retired pink bigger brads.


It is fairly large and I am not sure what I am going to use it for yet, but I decided to shrink it down a bit and make one to hold a set of 5 1/2' x 4 1/4" cards.

I will share those next time.


Happy creating!  :)


Sunday, March 2, 2014

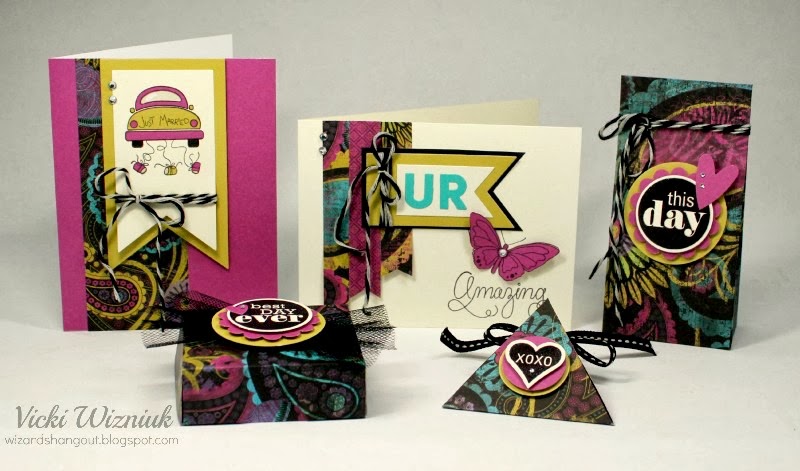
Laughing Lola One Sheet Wonder Set


Isn't this a great set?

And to think it is made with just one sheet of patterned paper!


Note:  I received the One Sheet Wonder instructions from Angie Kennedy Juda for joining her newsletter mailing list, but I don't have permission to share it with you.  (Her site is temporarily down, and she is working to get it fixed.)

So if you are looking for the instructions, I would suggest that you join her newsletter mailing list to see if you can get access to it that way.


Happy creating!  :)


Supplies used (all CTMH unless otherwise noted):
Paper:  Laughing Lola; Colonial White, Laughing Lola Gold, Laughing Lola Purple, Lagoon CS
Stamps:  Love This, It's Your Day - retired, Newlyweds
Inks:  Black, Versamark
Markers:  Whisper, Black
Embellishments:  Clear and Bitty Sparkles, Black Baker's Twine, Black Stitched Grosgrain - retired, Black Tulle - retired
Punches:  1 1/8", 1 1/4", 1 1/2", 2" circles (EK), Scallop circle (SU), Heart To Heart (SU)
Other:  Kraft knife, Stylus, 3D foam tape, Micro-tip scissors, Modern Alphabet Upper Die Collection (PTI), Banners Thinlets dies (SU)


Thursday, March 15, 2012

Featured on Jeanette Lynton's Blog!


Some of you may have already seen this, but yesterday I was featured on Jeanette Lynton's blog for her Spotlight on Art post. 

For those of you who are wondering who she is, Jeanette Lynton is the CEO of Close To My Heart.


Here's my featured artwork:


I created these items back in January for the chance to be featured... and as a papercrafter, it's all very exciting!

I am feeling very honoured.


I hope that one day I will get to meet Jeanette.

It's on my unwritten bucketlist.


Happy creating!  :)


Saturday, December 3, 2011

Teacher Gifts... Hot Chocolate Fry Boxes

I got the idea for this project after seeing this one by Mandy Leahy.


Cole has two teachers this year, so I wanted something that would be pretty easy to make and not too heavy on the pocketbook.

Aren't they cute?

They easily hold 3 packages of hot chocolate.


The stamped images are from A Sip and the little stamped snowflakes are from the Wonderland WOTG set. 

I used up some of my SU paper (retired), cardstock, inks and ribbons.

The fry box is a shape from the CTMH Cricut Art Philosophy cartridge, set at 10" for the cutting size.

For each box, I cut the shape out in cardstock and patterned paper, gluing the two pieces together for more strength.

The circles were cut at 2 3/4", and the spikey circles at 3 1/4", also using the same cartridge.

The snowflakes were cut using punches.


Happy creating!  :)


Supplies used:
Paper:  DSP Holiday Thyme - retired (SU); Cranberry Crisp and Chocolate Chip CS (SU), Colonial White CS (CTMH)
Stamps:  A Sip (CTMH), Wonderland WOTG set (CTMH)
Inks:  Cranberry Crisp and Chocolate Chip (SU)
Embellishments:  Cranberry Crisp and Chocolate Chip ribbons (SU), Colonial White buttons (CTMH), Natural Hemp (CTMH), Mocha Opaques (CTMH)
Other:  Mega Snowflake punch (Marvy Uchida), Snowflake punch (Martha Stewart), 3D foam tape, ScorTape (ScorPal)

* Cranberry Crisp may be a retired color (SU), I'm just not sure.

Tuesday, October 11, 2011

Elemental Shopping Bag and Set of Cards...


I offered this class to my peeps for National Cardmaking Day.

After class, I also offered an all-day crop in my new scrapbooking space.

What a great day!

Can't wait to do it again...


Complete credit for the project goes to fellow Consultant, Dena Hughes, who graciously allowed me to use her concept and idea for my class.  Thanks, Dena!
 
Here's the link so you can check out Dena's blog for yourself.


Happy creating!  :)


Supplies used (all CTMH unless otherwise noted):
Paper:  Elemental B&T; Colonial White, Sorbet, Kraft, Pacifica CS
Stamps:  Bohemian Alphabet, Party Pennants, Card Chatter Birthday, Wings WOTG - retired, Veranda WOTG - retired
Inks:  Pacifica, Sorbet, Desert Sand
Embellishments:  Antique Copper brads, Chocolate flower button, Chocolate polka dot organza, Sorbet ribbon, Sorbet waxy flax
Punches:  Real Estate Sign (EK), 1 1/8" circle (EK), Lg. Star (SU), Scallop Border (SU), 2" circle (Fiskars), Boho Blossoms punch (SU), Three Heart punch (SU), Leaf (Martha Stewart)
Other:   Plantin Schoolbook Cartridge (Provo Craft), Paper crimper, Bone folder, 3D foam tape


Wednesday, October 5, 2011

Winning MIFYH Contest Entry #3

This is my winning project #3 for the Make It From Your Heart contest.

It won for the Cricut project using Mischief Level 2 Paper pack category.


The cute little bag is cut using the new Art Philosophy Cricut cartridge.  I also used it to cut the spikey flower, scallop circle closure, circle, and the numbers.  And the "banners" on the chocolates were also cut with it.  :)

It's pretty darn cute, I have to say.  Love how it turned out.


Be sure to come back tomorrow for my last winning project.

I saved the best for last...  ;)


Happy creating!  :)


Supplies used (all CTMH):
Paper:  Mischief B&Ts; Colonial White, Black, Sunset CS
Stamp:  Wicked - Aug SOTM
Inks:  Black, Chocolate
Embellishment:  Bitty Sparkles
Other:  Cricut Art Philosophy cartridge, Sponge, Micro-tip scissors


Wednesday, December 8, 2010

H2H Challenge - It's Gift Week!


This week over at the Heart 2 Heart Challenge Blog, the challenge is to create a gift.

"We are focusing on gift items - NO cards! We want to see what you can create or dress up as a small gift for someone this holiday season."

So this is what I came up with.  I started with one 12x12 sheet each of Cranberry and Colonial White cardstock, and with some handy-dandy scoring, I came up with a box to fit a mug. 

Then I just pulled out some striped Mistletoe B&T, and a scallop border punch and created a simple strip to wrap around the Cranberry lid.  Too plain to leave it that way... so I cut 5 strips of Creative Basics Mistletoe B&T at 1x12, glued them end to end, and did a simple pleat fold, tacking them with a little glue in each of the center creases.  After I glued that onto my striped B&T, I sewed some buttons onto just the front section with some red/white twine.

For the tag, I used the A Sip stamp set and Holiday Trinkets stamp set for the Merry Christmas.

I love how it turned out.  Adorable!

Happy creating!  :)


Supplies used (all CTMH unless otherwise noted):
Paper:  Mistletoe, Creative Basics Mistletoe B&Ts; Cranberry, Colonial White, New England Ivy CS
Stamps:  A Sip, Holiday Trinkets
Inks:  Cranberry, Garnet, Olive, New England Ivy, Black
Embellishments:  Olive grosgrain, Colonial White buttons, Red and Green buttons (Autumn Leaves)
Other items:  Paper piercer, Floss needle, 1 1/4" circle punch, Scallop border punch (SU), Red/White twine (The Twinery)

Sunday, November 28, 2010

Snowman Treat Box


Saw these over at Lisa Young's blog and thought I'd give it a try.  Cute!

I don't have the Fancy Favor Box die, so I made my own box.
Here's my measurements:
6x12 White CS, score at 2 1/4", then turn and score at 2 1/4", 5 1/4", 7 1/2" and 10 1/2".
The finished size of this box is:  3 3/4" H x 3" W x 2 1/4" D

Happy creating!  :)


Supplies used (all CTMH unless otherwise noted):
Paper:  White Daisy, Black, Tulip CS; Olivia B&T
Ink:  Black marker, Tulip ink
Embellishments:  Tulip buttons, Natural hemp, 1" Chocolate Chip Double Stitched grosgrain (SU)
Punches:  5/8" and 1" circle (EK)
Other:  Micro-tip scissors, ScorTape (ScorPal)


Friday, August 20, 2010

Super Quick Card Set & Shopping Bag (Workshop to come...)

Hey all!  I thought I'd share this with you.  I made this set... gosh, probably this past Spring and I still hadn't posted it yet.  Mostly because I was hoping to do a workshop, but it just hasn't happened.  So I'm still going to plan to do it for a workshop sometime in the future, I just don't know when that will be yet.

Isn't this little shopping bag just the cutest?
It easily holds the 8 cards and envelopes we will create for our class.


And here's the quick, but cute cards...


A huge thanks goes out to fellow Consultant Amanda DesJardins who created and then shared her class instructions with me.  Luv ya, Amanda!

So for anyone who may be interested in taking my class, keep tuned, as I won't be sharing Amanda's instructions here simply because they are not mine to share.   ;)   


Happy creating!  :)


Supplies used (all CTMH unless otherwise noted):
Paper:  Animal Cookies B&T; White Daisy, Dutch Blue, Tulip CS
Stamps:  Thoughtful Seasons; Warmest Regards (SU)
Inks:  Black, Tulip, Dutch Blue, Clover Meadow, Tulip, Black Journal Pen
Punch:  Scallop border (SU)
Other items:  Silver eyelets, Silver cording (Walmart), 3D foam tape, Scor-Tape (ScorPal)

Wednesday, March 3, 2010

Easter Wishes Chocolate Treats...


I have been a bad poster lately...  I have projects to share, some already even photographed, some still needing to have their pictures taken.  I've been a little pre-occupied with work, income taxes for myself, for my twin daughters, for my father, dealing with my Dad's investments, renewing my GICs, house building decisions... the list goes on. 

All that and the hearing is going to be held tomorrow in regards to the guy who beat up my aging father almost 2 years ago.  I have to decide if I'm going to attend, since I'm the only family member here.  I find it rather stressful... the guy who did it is not all there, if you know what I mean, with a history of mental illness.  So do I really want to sit in a courtroom with him?  No, not really.  Anyways, I'm feeling a tad stressed with my decision.

I'll get to see my Dad this weekend.  It's been about 4-5 weeks since my last visit.  He's not doing very well, so I'm eager to see if he remembers me this time.  Last time there was not even an inkling... I was just a stranger to him.  Boy, dementia sucks!  I really hope to not end up that way.  Please let me go quickly!

Sorry for the downer of a post...  maybe I should go eat all the chocolates in this Easter treat bag before I head off to work!  Chocolate makes everything better, doesn't it?  lol

~~~~~~~~~~~~~~~~~~~~~~~~~~

For the bag itself, I used an old Coluzzle template that my BFF gave me.  She was going to sell it at a garage sale at our LSS last summer, but I quickly grabbed that puppy up along with another one that I think makes a little box. 

Other than that, for supplies I used White Daisy and Petal CS, Paper Garden B&T, Happy Easter and Springtime stamp sets, Blush, Petal and Black inks, Hollyhock dashed grosgrain, paper flowers from Big Pinks and Spring Blossom.  The buttons are non-CTMH from my stash and the mauve keytag chain is from my LSS.  Oh and  I also used my circle Coluzzle to cut the window and some transparency from my LSS, too.  I filled a little clear bag, that CTMH used to sell, with Hershey's Kisses and tied it closed with more of the Hollyhock ribbon. 

Thursday, February 4, 2010

Teacher Thank You Gift Box (Stamping Royalty Challenge #5)


I made this teacher thank you gift box for the Stamping Royalty Challenge #5. I was inspired by one I saw on Amy Sheffer's blog. You can see her totally cute project and her box instructions HERE. I had picked up the same apple chipboard book (that Amy used) from Michael's in their $1.50 bins a couple of weeks ago, not having a project in mind at the time, but pretty happy to have bought them all the same. 

I'm not yet sure what I will put in it for a year-end gift for my son's teacher, but I still have some time to figure that out...  lol

Supplies used (all CTMH unless otherwise noted):
Paper:  Notebook and Jingle B&T; Colonial White, Chocolate and Topiary CS
Stamps:  Thank You, Classmate Alphabet
Inks:  Black, Chocolate inks; Black journal pen (SU)
Chipboard:  't' from DE Monograms; Apple book (Studio 18 - Michael's)
Embellishments:  Cranberry bigger brad
Tools:  Micro-tip scissors; Piercing tool; Make-up sponge (other), Scor-Pal (LSS)
Punches:  Binding edge (EK Success)

Saturday, October 24, 2009

Candy Box


Isn't this cute? It's little and perfect for candies! I could see this used for so many differnt occasions. The template for this is another one of Becky Robert's 12 Days of Christmas templates that you can find here at http://inkingidaho.blogspot.com/ , just look on her sidebar.

I easily fit 6 individually packed Wintergreen Lifesavers in there. I had them left over from my Halloween Matchbook treats for my son's classmates.

The finished box measures 2 3/4" tall x 2 1/4" wide x 3/4" deep. So cute! I changed the top to tuck inside because my flap wouldn't sit closed otherwise.

Supplies used (all CTMH unless otherwise noted): Becky Robert's templates; Tulip and Juniper CS; CB Jingle B&T; White Daisy brads; 1 1/4" and 5/8" circle punches (EK Success); Corner rounder - for the flap.

Friday, October 23, 2009

{Trick-or-} Treat Box


This box actually holds quite a bit of stuff; I was surprised at how much I could fit into it.

For the how-to to make your own box, check out Becky's tutorial HERE, just scroll down a bit for the instructions.

Supplies used (all CTMH unless otherwise noted): October Word Puzzle, and Say it in Style stamp sets; Enchanted B&T; Black and White Daisy CS; Black, Olive, and Honey inks; Smokey Plum bigger brads; Black/White Gingham ribbon (Walmart); Cirlce Coluzzle; Paper Dolls Cricut Cartridge (Provo Craft); Googly eyes (other); 5/8" circle punch (EK Success); Hole punch (Fiskars); Score Pal; 3D foam tape (other); and of course Chocolates (Lindt).

Saturday, October 10, 2009

Blue Snowflake Treat Box - altered


I'm having fun playing with my Treat Box template today. I love anything easy, and this template is super easy to put together. No printing and/or tracing necessary... just start with a specific size of cardstock and follow simple cutting and scoring instructions. Just the way I like it! lol

So while I was gluing this one together, I decided to change it up a little and make the top into a box top. It was so easy to do... I think it totally changes the look of the Treat Box and I love how it turned out.

I stamped the snowflake images with Versamark onto Indian Corn Blue cardstock, then took a 50/50 mixture of Prisma Glitter and White embossing powder and sprinkled it over my snowflakes, and then heat embossed them. It doesn't show up in the picture, but it gives the snowflakes a hint of sparkle. TIP: Mixing glitter with embossing powder and heat setting it seals in the glitter so you don't have it falling off your project afterwards. Gotta love that!

*** If you are interested in getting one of my templates I've created, I am giving them away for free as a bonus with a purchase of one of my handmade cards. Details can be found on my sidebar.

Supplies used (all CTMH unless otherwise noted): Treat Box template (by Vicki); Feathery Flakes, and Just for the Holidays stamp sets; Indian Corn Blue, and White Daisy cardstock; Indian Corn Blue ink; Nestabilities Labels One die (Spellbinders); Mega Snowflake punch (Marvy Uchida); 1 1/4" circle punch (EK Success); White embossing powder; Prisma Glitter; Versamark; Colonial White waxy flax; Silver eyelet; Silver grommets (Walmart); White grosgrain (Walmart); 3D Foam tape (other).

Snowflake Gift Bag/Box


I made this Snowflake Gift Bag/Box using my Treat Box template I created for giving yummy treats for any occasion. Just so you can tell how big it is, this bag measures 6" tall.

*** If you are interested in getting one of my templates I created, I am giving them away for free as a bonus with a purchase of one of my handmade cards. Details can be found on my sidebar.

Supplies used (all CTMH unless otherwise noted): Treat Box template (by Vicki); Just for the Holidays stamp set; Cranberry, Topiary, and White Daisy CS; Topiary, and Cranberry inks; Topiary dashed grosgrain; Punches: 5/8", 1 1/4", 1 1/2" circle (EK Success), Mega Scallop oval, and Mega Snowflake (Marvy Uchida), Snowflake (Martha Stewart), Hole punches (Fiskars); Crop-a-dile (We R Memory Keepers), Silver grommets (Walmart); Chain and fasteners (plumming chain); Foam tape (other).

Wednesday, September 23, 2009

A Christmas Card Boxed Set


I've purchased a few of Lauren's templates, but this is the first one I've used. This one is called Fold n' Go.

I wasn't sure what to do with it after I made it because I was just playing, not creating with purpose. I tend to do that a lot... I decided this morning to make some simple cards to go inside and this is what I came up with.

My cards are 4x3 in size and I will make up some envelopes to fit the odd-sized cards, maybe later today. For the card design, I used Wishes: Simple Strip pattern.

Supplies used (all CTMH unless otherwise noted:) Wishes; Holiday Warmth, Christmas Melodies, The Season Defined, Christmas Scripts stamp sets; Creative Basics Jingle B&Ts; Colonial White and Black CS; Juniper and Black inks; White grosgrain; Cranberry button; Black waxy flax; White hemp; CC rhinestone frames; CC adhesive pearls; Chipboard candycane (Bazzill); Loop edge/corner punch (Martha Stewart); 1" and 1 1/8" circle punches (EK Success); Pop-dots (other); Lauren Meader's Fold n' Go box template.

Tuesday, September 22, 2009

Warm Winter Wishes (Box in a Bag)


These are pretty quick and easy to put together. You can find the tutorial by Diana Gibbs here.

The only change I made was for the B&T; I used 11" x 6" (instead of 11 x 5 1/2) to make it slightly taller.

Supplies used (all CTMH unless otherwise noted): Aspen B&T; Chocolate and White Daisy CS; Four Seasons, Christmas Scripts, and Tiny Typewriter Alpha stamp sets; Chocolate and Twilight inks; White grosgrain; Uniball Signo White gel pen (SU); Cropadile (but you can use a hole punch); 2 1/2" and 3" scallop circles (Marvy Uchida), Loop edge punch (Martha Stewart), Tab punch (SU); Make-up sponge (other).

Tuesday, June 16, 2009

A more masculine treat box for father's day!


I love the metal look... can it get any more masculine than that? Especially when you add screw-head brads to complete the look! Here's another Treat Box done up for Father's Day.

What I used (all CTMH unless otherwise noted):
Classmate Alphabet stamp set
Tiny Typewriter Alphabet stamp set
Black and White Daisy CS
Black ink
Coluzzle circle, cutting mat and knife
Foil sheets
Embossing plate (SU)
Cuttlebug (Provo Craft)
Embossing mats (Spellbinders)
Screw-head silver brads (other)
Silver Hodgepodge Hardware and brads(SU)
Pop-dots (other)
ScoreTape (other)
Velcro Dot (other)

Sunday, June 14, 2009

Treat Box (my new template)


Here's a sample of my latest and greatest! I created the template for this little 6x3.5x2.5" goodie bag yesterday and I'm loving it!

Since Dad's day is coming up next weekend, I thought this would be a good opportunity to make something for Dad (that would be my husband), to go along with his gift, which I'll post possibly later today.

I have a bunch of cellophane bags I purchased from CTMH a very long time ago (and I don't even know if they are still available anymore), but I do know that they are still available through SU, because I've seen them in their catalog.

I filled the cellophane bag with chocolate covered coffee beans I picked up while on vacation in Hawaii at the beginning of the year.

What I used (all CTMH unless otherwise noted):
World's Best Dad stamp set
Aspen B&T
Outdoor Denim and White Daisy CS
Acetate sheet
Cellophane bag
Twilight ink
Outdoor Denim grosgrain
Screw-head brads (other)
1 1/4" circle punch (EK Success)
Key Tag punch (SU)
Circle Coluzzle
Velcro dot (other)
Pop-dots (other)
And chocolate covered coffee beans

Wednesday, October 8, 2008

Odds 'n' ends...

Here's a real hodgepodge of things to post today. I did the cards this morning, but the little Frankenstein goodie box was done awhile ago. Instructions for it are found here: http://chicnscratch.typepad.comstampinacademy/2008/09/frankenstein-bo.html


This one is a lift from one I saw on the Creating Keepsakes website this morning at 3:30 AM, when I couldn't sleep. Something about it just appealed to me, so I had to recreate it (after I finally went back to bed and slept a little longer).

What I used (all CTMH unless otherwise noted):
Everlasting B&Ts and Evensong B&T
Desert Sand C/S
CTMH Twill ribbon
Cranberry brads
Definitely Decorative Pines (SU)
Many Merry Messages (SU)
Pop dots (other)
Black, New England Ivy and Chocolate inks


This one I started by using a 1" circle punch for a mask for the moon, and onto a 4 x 5 1/4" piece of White Daisy C/S I brayered on Crystal Blue ink. I took off the mask, then I stamped on the trees and then the moose in Black ink. I tore a piece of scrap cardstock and masked off the sky and sponged on the Black ink for the ground. Then I took a different sponge and sponged on Star Spangled Blue ink, leaving the lighter shade of Crystal Blue showing more around the moon. Lastly, I took a white gel pen and tried my best to highlight where the moonlight would shine.

What I used (all CTMH unless otherwise noted):
Black and White Daisy C/S
Black, Crystal Blue and Star Spangled Blue inks
1" circle punch (other)
Definitely Decorative Pines (SU)
Uniball Signo White Gel Pen (SU)
Sponges (other)


Isn't he CUTE? And he is sooooo easy to make. Just click on the link above... you'll be able see a video tutorial on how to make him.
What I used (all CTMH unless otherwise noted):
Olive, Black and White Daisy C/S
Black marker
1" and 3/4" circle punches (other)
Unibal Signo White Gel Pen (SU)
Scissors (to hand-cut the hair)
Hole punch (other)
Black pipe cleaner (other)
Pop-dots (other)
Sponge (other)

LinkWithin

Blog Widget by LinkWithin